My goals were simple. First, to have everything I needed for virtual delivery, including a backup system ‘just in case’ it was needed. And second, to have the best lighting and sound possible.
Here’s a quick look at what I brought and one change I would make for next time. (And note that nothing here is sponsored, these are just items that I use.)
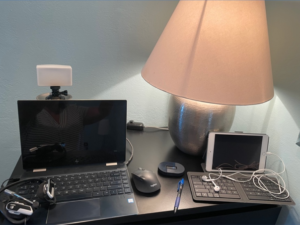
1. Laptop with Charging Cord
I’ve relied on my HP Spectre x360 laptop for years. It’s lightweight, portable, and can easily be re-configured to use as a touchpad tablet. It runs on Windows and has great battery life. It’s important to remember the charging cord, and next time I’ll bring my travel surge protector.
2. External Headset
A headset is a must for audio clarity. It’s almost always a mistake to use a device’s microphone and speaker when you want to sound your best on a video call. I took a trusted, behind-the-ears, wired USB headset with a boom mic (my specific one is no longer available for purchase but it’s a Logi brand). Wired is a better choice than wireless/Bluetooth, especially when you’re not sure of possible interference in a new location.
3. Portable Lighting
Next to clear audio, good lighting was my next priority. Years ago, someone recommended a Lume Cube for my laptop, and I’ve traveled with it ever since. The suction cup sticks to a laptop, and its adjustable lighting options are perfect.
4. External Mouse
I love my trackpad and favor it over a mouse on most occasions. But since I was teaching virtual classes, I wanted to have fast fingers when annotating on screen. For me, that means using an external mouse. I have a portable travel mouse that usually comes with me on the road, but it’s gone MIA so I just packed the one I use in my home office. It’s my favorite because with a click of a button I can switch between my devices (which wasn’t important for this temporary office setup but is an essential feature for me at home.)
5. Wi-Fi Hotspot
Internet connectivity on the road can be notoriously tricky. I’ve worked from places that have had amazingly fast connections, and other places that can barely open a simple website. So, I always travel with an extra option for internet access. My go-to has been a Verizon Mi-Fi, although smartphones with data plans also work for this purpose.
6. iPad Mini with External Keyboard
My iPad mini has become my go-to travel device – for reading, watching videos, and letting my young son play games during long car trips. But its most important role is to be my backup connection in my temporary remote office setup. I pair it with an external folding keyboard for ease of use. It’s on its own data plan for internet, and I always use the wired earbuds (see #2 above.)
In summary, here’s what my temporary workstation setup looked like:

My temporary workstation setup.
Location, Location, Location

In other remote working locations, I’ve used books, boxes, and even a kitchen pot as a resting stand for my laptop during online events, to achieve the right webcam angle.
The first thing I did upon arriving at my latest destination was to scope out a good location for remote working. More specifically, a location that had good lighting and space to set up what I needed for virtual facilitation.
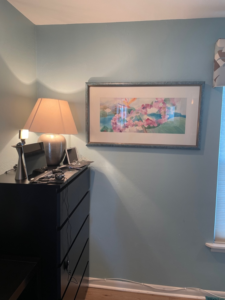
In this rental beach house, I found the perfect “standing” desk by using the top of a dresser. It wasn’t facing a window, but it had a lamp and with my portable light, it worked well. I wanted my webcam at eye level, and this space was just the right height for my 5’5” frame.
Based on my most recent experience, here are my 3 top tips for creating a temporary remote setup for facilitating. virtual classes:
Bring an external wired headset – Audio quality is essential, and a wired headset will sound best.
Search for the best spot– Get creative with your location, it doesn’t have to be a desk or table. Find a workspace with decent lighting and a proper webcam angle.
Test Your Setup Before Your First Online Event – Create and join a test meeting to ensure your internet connection is strong, the audio settings are correct, and your webcam lighting is as good as it can be.
Keep in mind that your setup doesn’t have to be perfect. Most people are understanding, especially right now with much of the world working remotely. But with some intentional advance planning, you can create a remote workspace in a temporary location that allows you to facilitate virtual events.
For me, having the backup iPad and portable keyboard became a lifesaver because an entire glass of water spilled on my laptop about halfway through our trip. Thankfully my warranty with accidental damage protection is still in effect, so it can be repaired, but I relied on my backup more than initially planned. I’m glad I had it!
Have you worked remotely in a temporary location? What tips would you add?

